| |
How to use Outlook SMS
Outlook SMS is simple and easy to use. You must first register as a user to use Outlook SMS. Just follow 3 simple steps to download and install the application into your PC and start sending SMS from your desktop!
After installing the Outlook SMS into your Outlook, you will notice that there is an icon like this  in your Outlook toolbar. Click on the icon to start using Outlook SMS. in your Outlook toolbar. Click on the icon to start using Outlook SMS.
Alternatively, you will also find this icon  on your desktop. You can also use Outlook SMS by clicking on this icon; however, you will not be able to gain access to the Outlook address book. on your desktop. You can also use Outlook SMS by clicking on this icon; however, you will not be able to gain access to the Outlook address book.
Make sure you have enough SMS credits before sending SMS. Below are some sample screen shots and instructions on how to use Outlook SMS.
User login Step 1: Enter your username and password to verify you are an authorized and valid user.
Step 2: Click “Login” to log in. |
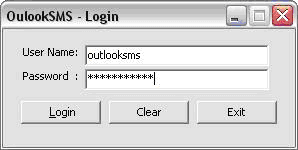
Picture 1: User Login |
Send SMS Messages
Send out SMS by 4 simple steps! Read on to find out how.
Step 1: To send SMS, click on “New”.
Step 2: There are 2 options for entering mobile numbers:
- Typing each mobile number manually (Picture 2:Compose New Message)
- Select the contact from Outlook address book (Picture 3: Address Book)
Step 3: There are also 2 options inputting your message content:
- Type into the message content box provided (Picture 2: Compose New Message)
- Choose a template which has been saved (Picture 4: Message Template)
Step 4: Once mobile numbers and message have been inserted, click “Send” to activate sending.
Note: Credit balance will be deducted automatically once the message has been sent.
|
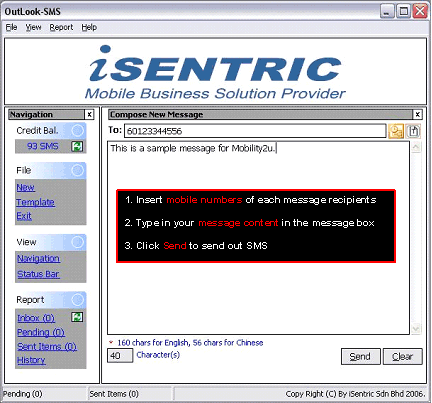
Picture 2: Compose New Message
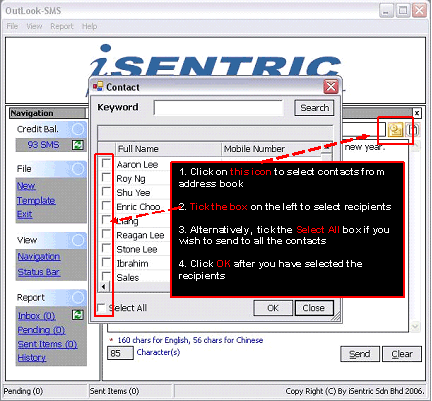
Picture 3: Address Book

Picture 4: Message Template |
Message Template
Messages can be saved as a template. To save a template, follow the instructions below:
Step 1: Click on “Template” on the left navigation toolbar. (Picture 5: Template)
Step 2: Click on the “Add” icon to add a message template.
Step 3: Type in the message to be saved.
Step 4: Additionally, customize message to greet by name, which are taken from Outlook’s Address Book. Fields can be inserted by clicking on “Insert” icon. (Picture 6: Add Template)
Step 5: Click on “Save” to save the message template.
Step 6: Templates can be edited by clicking on the “Edit” icon. (Picture 5: Template) |
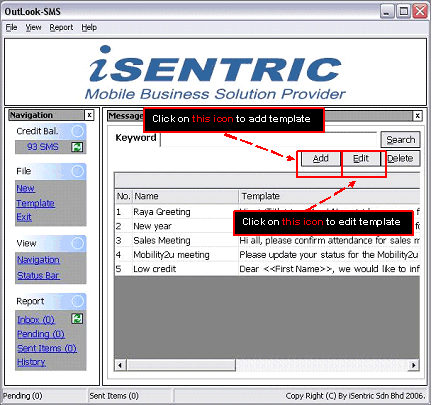
Picture 5: Template
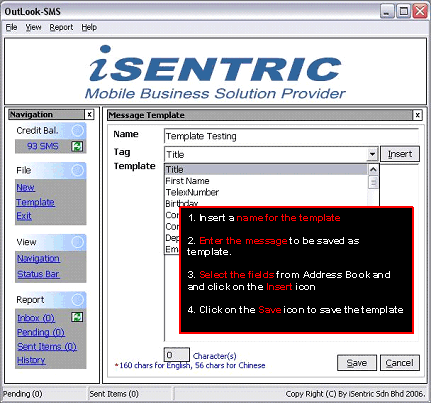
Picture 6: Insert Field |
Reports: Inbox
Message recipients can reply SMS back to Outlook SMS.
Reply SMS message by typing: REPLY<space>Username<space>Reply Message. Send the reply to 39398.
For example: REPLY Outlooksms I will attend the meeting at 3pm.
Once a reply message is received, it will be saved in the “Inbox”. (Picture 7: Inbox)
Inbox will show the details of each SMS received:
- Mobile number
- Date SMS received
- Reply message
|

Picture 7: Inbox |
Reports:Pending
Messages which are not successfully sent will be shown in the “Pending”.
The log will show the following details: (Picture 8: Pending)
- Mobile number of recipient
- Date of the sent message
- The message content
- The reason why the message could not be delivered
- The number of times the system has retry to send the message. The system will automatically retry to resend the message every 10 minutes.
|

Picture 8: Pending |
Reports: Sent Item
Messages which have been successfully sent will be shown in the “Sent Items”.
The log will show the following details: (Picture 9: Sent Items)
- Mobile number of recipient
- Date of the sent message
- The message content
|
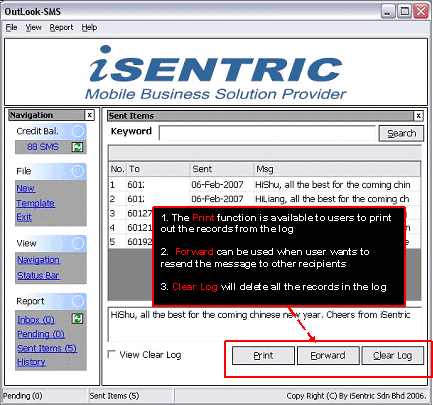
Picture 9: Sent Items |
Reports: History
Messages which have been sent will be shown in the “History”.
The log will show the following details: (Picture 10: History)
- The message content
- The number of times the message has been sent
|
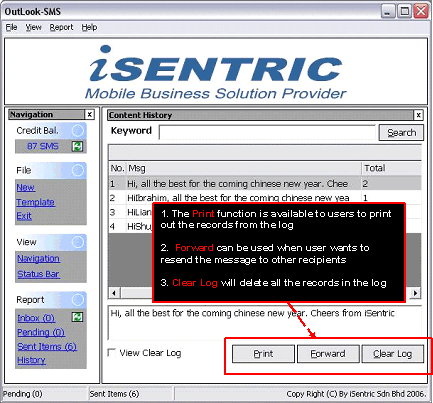
Picture 10: History |